Using Named Pipes in C++
Created on: 2016-01-01 19:00:00 -0500
Categories: Software Development
Inter-process communication (IPC) methods offer interfaces for one process to share data with another process. One IPC method we will go over in this post is the named pipe. A named pipe creates a file on the file system that allows a process to open and either read or write to it. Another process could then read the contents of the pipe. The named piped used in this tutorial will follow a FIFO style pipe. The files used in this tutorial can be found here.
This tutorial will use 2 programs. The simpleOutPipe program will place data into the pipe and the simpleInPipe program will read the data from the pipe. This pattern of information passing is similiar to the producer consumer problem.
Below is the contents of the simpleOutPipe source file.
#include <cstring>
#include <fstream>
#include <string>
#include <iostream>
#include <sstream>
#include <thread>
#include <chrono>
#include <random>
#include "helper.h"
using namespace std;

int main(){
  ofstream pipe0;
  string fifoData;
  default_random_engine generator;
  uniform_int_distribution distribution(1,15);
  uniform_int_distribution analog_sample(1,1024);
  char buffer[64];
  int result;

  result = checkFifoPipe();
  if (result == -1){
    /* create pipe */
    cout << "Creating pipe" << endl;
    result = createFifoPipe();
    if (result == -1){
      cout << "Failed to create pipe" << endl;
      exit(-1);
    }
  }

  while(1){
    this_thread::sleep_for(chrono::milliseconds(distribution(generator)*1000));
    pipe0.open(FIFO_PIPE,ofstream::out);
    int rand_num = analog_sample(generator);
    pipe0 << to_string(rand_num);
    pipe0.flush();
    pipe0.close();
  }
 return 0;
}
This application does 2 things. First it checks to see if the presence of the pipe is created and then opens the pipe in a write mode. If the pipe doesn’t exist then we create one (the function checkFifoPipe and createFifoPipe have been defined in helper.cpp). Then we enter a while loop that never stops. Inside the while loop we generate a random number to cause the application to sleep for a bit and then we write another random number into the pipe.
Now we will shift focus to the simpleInPipe source file.
#include <fstream>
#include <string>
#include <iostream>
#include <sstream>
#include <thread>
#include <chrono>
#include "helper.h"
using namespace std;

int main(){
  ifstream pipe0;
  string fifoData;
  int tries = 3;

  while(tries > -1){
    int result;
    result = checkFifoPipe();
    if (result == 0){
      break;
    } else {
      if (tries == 0){
        cout << "Failed to connect to pipe" << endl;
        exit(-1);
      } else {
        tries--;
        cout << "Waiting for pipe to open. Tries left: " << tries << endl;
        this_thread::sleep_for(chrono::milliseconds(2000));
      }
    }
  }

  while(1){
    pipe0.open(FIFO_PIPE,ios::in);
    getline(pipe0, fifoData);
    cout << fifoData << endl;
    pipe0.close();
  }
  return 0;
}
This application also does 2 things. First it checks to see if the presence of the pipe exists. If it doesn’t it waits for 2 seconds and tries again. There is a counter that only checks the pipe 3 times and exits the program if a pipe hasn’t been created after 3 attempts. Then we enter a while loop that never stops. Inside the while loop we read the contents of the pipe and write the contents to the screen.
Normally, an application that has a while loop with no sleeping or blocking condition will be taxing on the system. However, the FIFOnamed pipe is a special case. When an application reads from a FIFO pipe it will be put into a block state until data is available. According to the man pages,
“Opening a FIFO for reading normally blocks until some other process opens the same FIFO for writing, and vice versa.”
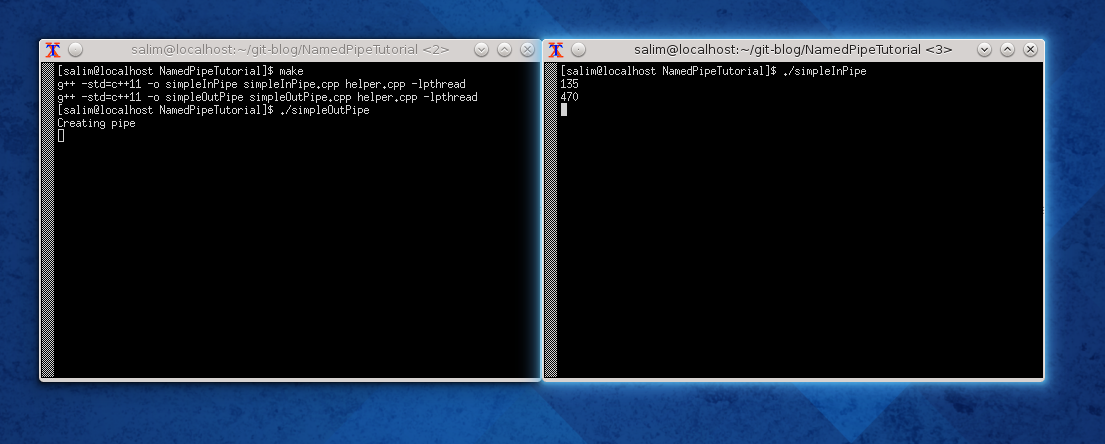
To run this example on a Linux system you will need to first compile the code. There is a Makefile that comes with this tutorial located on the GitHub account. Simply run the command to compile both programs:
$ makeAfter it compiles start another terminal window. In the first window run the simpleOutPipe by issuing the following command:
$ ./simpleOutPipeIn the second window run the following command:
$ ./simpleInPipeShortly you will see some random numbers appear.
This wraps up this tutorial. In my future tutorials I will be using this code to help communicate with other applications and GPIO subsystems.